

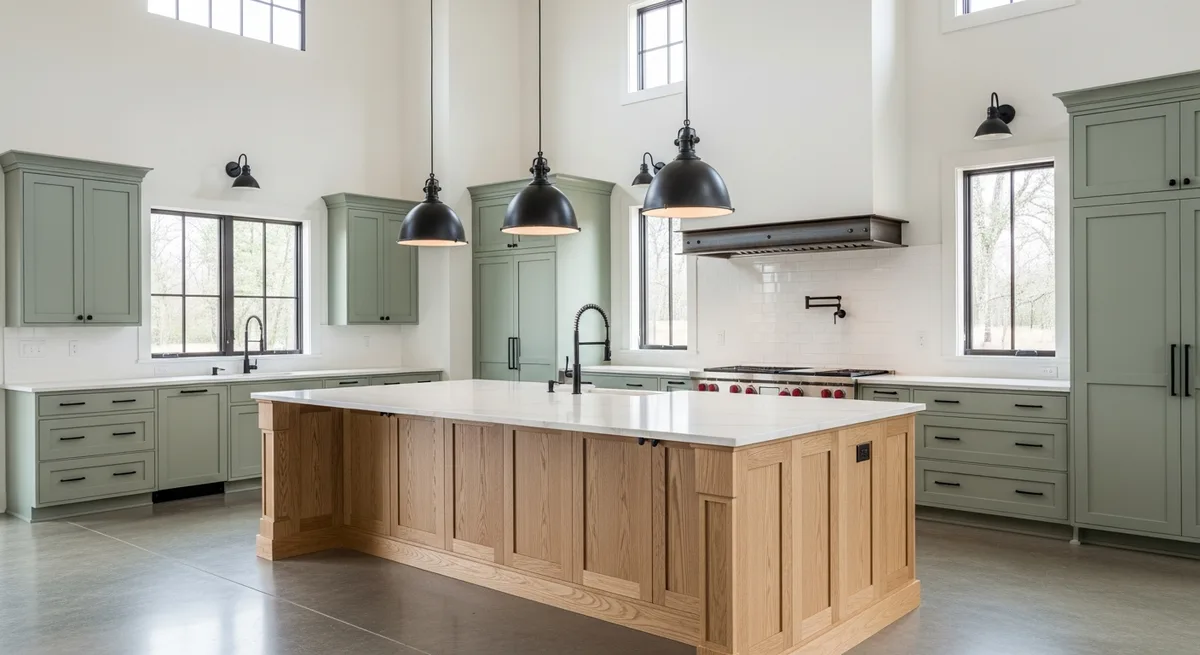
Why Barndominium Kitchens Are Different
Kitchen design in a barndominium presents a specific challenge that doesn't exist in a traditional house: you're fitting a highly functional, equipment-heavy room into a wide-open plan with no walls to define the space. In a conventional home, the kitchen has walls. In a barndominium, the kitchen has a floor zone and whatever visual boundaries you create through layout and design.
Get this right and you have one of the best kitchens imaginable: generous space, connection to the living area, room for a proper island. Get it wrong and you have a kitchen that feels disconnected, has awkward traffic flow, and never quite functions the way it should.
Here are the layouts and design choices that work, drawn from years of watching clients finish their shells and learning what they wish they'd done differently.
The 3 Layouts That Work
1. The Perimeter Galley
The perimeter galley runs all kitchen functions (refrigerator, range, sink, prep surfaces) along one exterior wall, with the island perpendicular or parallel in front of it. This is the most efficient kitchen layout for cooking, keeps all plumbing on one wall, and creates a clear kitchen zone without closing off the open plan.
Best for: builds where the kitchen and living area share one long open space, where the entry is at one end of the building, and where the cook wants to face the living area while working.
What makes it work: a 12-foot ceiling in the cooking zone (standard in most SIP shells) allows for full-height upper cabinets plus a statement range hood. The island carries the seating and serves as the visual separation between kitchen and living.
2. The L-Shape With Oversized Island
The L-shape wraps one corner of the building, typically placing the range on one wall and the sink/refrigerator on the perpendicular wall. The island occupies the center of the kitchen zone, usually oriented to face the living area.
This configuration works exceptionally well when the kitchen is in a corner of the floor plan, which is often the case when the entry is centered and bedrooms run down one side. The L anchors two walls without creating a closed-off feeling, and the island provides both prep space and seating.
Best for: corner kitchen placements, islands that double as the everyday eating spot, and builds where the dining area is part of the same open volume as the kitchen and living room.
3. The Walk-Through Island Kitchen
For very large open-plan shells (2,500 sq ft and up), a double island configuration works well: a prep island close to the range wall and a larger seating island farther into the space. This creates a kitchen that reads as a full room within the open plan, defined by its elements rather than by walls.
The key is sizing: the prep island should be 4 by 6 feet minimum, the seating island 4 by 10 feet minimum. Undersized islands in a large volume look like afterthoughts.
What Doesn't Work
The single most common mistake in barndominium kitchen planning: placing the kitchen in the middle of the floor plan. Kitchen islands in the center of the building interrupt traffic flow from the entry to the bedrooms, create noise and smell transfer issues in the sleeping areas, and feel oddly disconnected from both the living area and the exterior. Kitchens belong on an exterior wall, period.
The second most common mistake: undersizing the island. A 4-by-6-foot island looks fine in a 1,200 sq ft house. In a 30-foot-wide, 12-foot-ceiling barndominium shell, it looks like a butcher block on legs in an airplane hangar. Size your island for the volume of the space, not just for the functional needs of the kitchen. Plan for 10 feet minimum in a 2,000+ sq ft build.
Ceiling Height Is Your Friend
Most SIP Homestead Shells have 10 to 12 foot walls, which means kitchen ceiling heights of 10 to 14 feet depending on the roof pitch. Use this. Full-height cabinetry (to the ceiling, not stopping at 8 feet with a gap above) makes kitchen storage dramatically more functional and visually anchors the kitchen in the tall space.
Statement range hoods are a barndominium kitchen signature. A custom-welded steel hood, a shiplap-wrapped boxed hood, or a plaster arch hood that reaches 6 to 8 feet above the range is visually appropriate at 12-foot ceiling heights. A standard 36-inch residential hood at the same height looks like it's floating in a warehouse.
Finishes That Bridge Industrial and Residential
The SIP shell aesthetic (metal exterior, concrete slab, clean geometric form) tends toward industrial. The kitchen is where most people want to introduce warmth. The finishes that bridge this divide best:
- Painted shaker cabinets in warm whites or sage greens: not stark white, which fights the concrete slab. Benjamin Moore White Dove or Sherwin-Williams Oyster White work well. Sage green lowers on white uppers is a popular combination.
- Quartz in concrete or soft stone tones: Calacatta Quartz, Cambria Portrush, or similar patterns that read as stone but don't require sealing. Avoid high-contrast black marble patterns in open plan kitchens; they compete visually with everything around them.
- Mixed metal hardware: matte black and unlacquered brass together are the dominant combination in barndominium kitchens right now. Brushed nickel is safe but flat in a space this large.
- Open shelving on one wall section: not the entire kitchen, just a section of 12-inch floating shelves in white oak or black walnut introduces organic material texture that softens the industrial frame.
- Concrete or porcelain tile floors in the kitchen zone: 24x48 large format tile in a concrete look flows from the slab naturally and defines the kitchen zone when the living area has a different floor treatment.
Lighting in a Tall Open Kitchen
Recessed cans alone don't work at 12+ feet; they're too far from the work surface. Layer your lighting: pendants over the island (hung at 7 feet above floor), under-cabinet lighting for the perimeter counters, and a large statement fixture over the dining table if it's in the same volume. Recessed cans for general fill at the ceiling are fine but shouldn't be the only kitchen light source.
Planning Ahead Before the Shell Goes Up
The best time to plan your kitchen layout is before your shell is erected, specifically when your engineered drawings are being finalized. Anchor bolt placement and utility rough-in locations are set at the slab stage. If you want your range on the north wall with a gas line, plan that before concrete is poured. If you want a farmhouse sink with a window above it on the east wall, that window placement needs to be in the drawings.
Talk to your builder early. The SIP shell is rigid: windows and doors are cut into panels at the factory. Moving them after the fact is expensive. Your kitchen layout should drive window placement in the kitchen zone, not the other way around.