

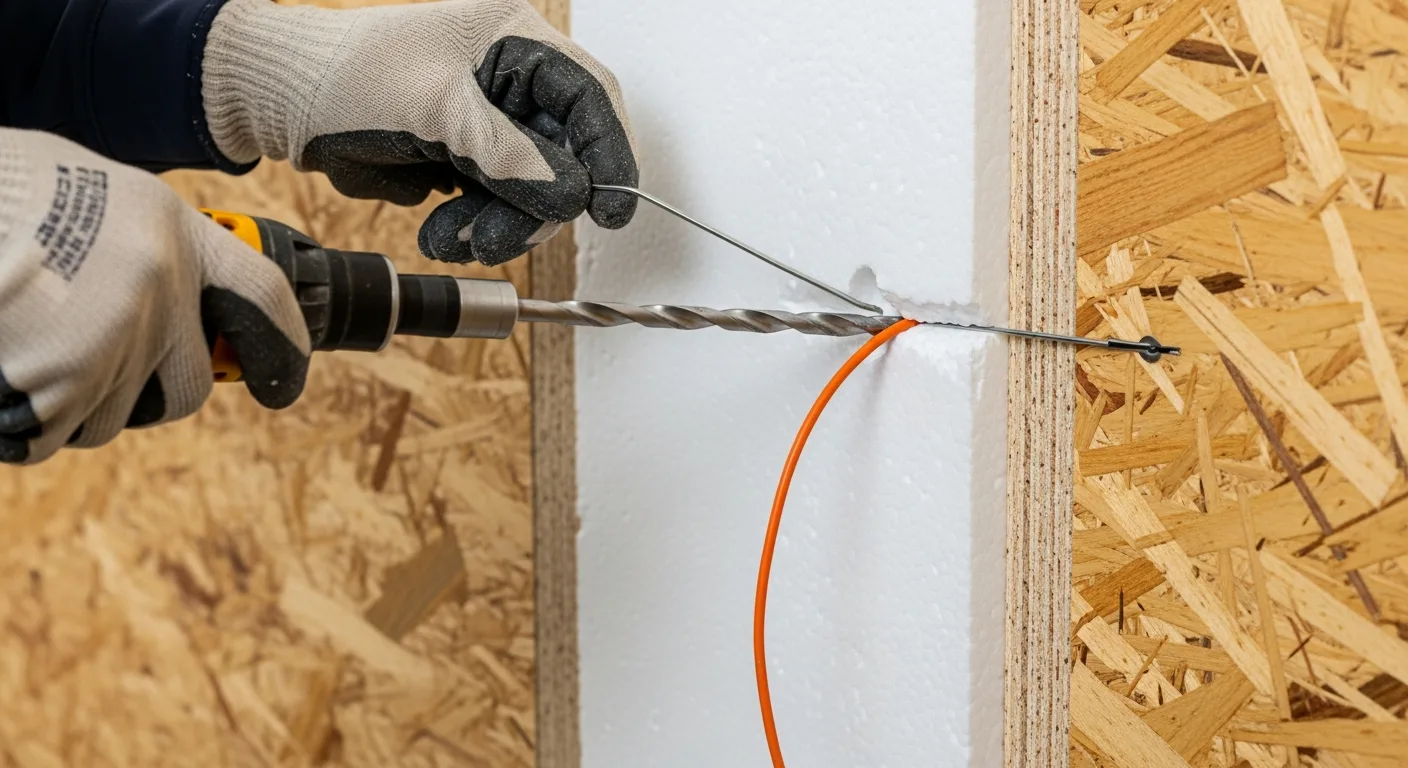
SIP Panels and Electrical: Why This Is Different
Stick-frame construction gives electricians a familiar system: drill through studs, run wire through bays, staple to framing. SIP panels (structural insulated panels with an EPS foam core) don't work that way. There are no open stud bays. The foam core is continuous from interior to exterior sheathing, which means every electrical chase must be planned and cut before or during panel installation.
Think of this as a planning requirement rather than a disadvantage. When you plan it correctly, SIP electrical rough-in is actually faster and cleaner than stick frame work because the chases create organized, predictable wire pathways rather than the maze of holes and bends that stick frame wiring requires. But if you don't plan it correctly, retrofitting a missed outlet or circuit is an expensive, time-consuming process that involves cutting foam and patching panels.
How Electrical Chases Work in SIP Panels
A chase is a pre-routed channel cut through the EPS foam core of the panel. Chases run horizontally (for outlet and switch circuits) and vertically (to connect horizontal runs to the top or bottom plate). Most SIP manufacturers can factory-cut chases to your electrical plan for a modest upcharge, and it's almost always worth doing for wall panels.
Standard horizontal chase heights for outlets are 12 to 18 inches from the finished floor. Switch chases run at 44 to 48 inches. Chase diameter is typically 1.5 to 2 inches, large enough for 12/2 or 14/2 Romex plus future capacity.
Ceiling lighting in a SIP barndominium typically runs through the truss bay above the drywall ceiling: your electrician drills through the bottom chords of the roof trusses to route wire between fixtures and switches, just as in conventional construction. If you upgrade to SIP roof panels, ceiling chases must be specified at the factory before panels are cut. Either way, plan your ceiling lighting layout before the roof goes up; retrofitting runs through a completed ceiling assembly is slow and costly.
Panel Sizing: What Barndominiums Actually Need
A 200-amp main panel is the minimum for a standard residential barndominium (1,500 to 2,400 sq ft with no attached shop). For most builds, 200A is adequate for living space loads: kitchen appliances, HVAC, water heater, lighting, and standard outlets. But if your project includes any of the following, plan for more:
- Attached shop or garage: Shop tools (compressors, welders, lifts) draw significant amperage. An attached shop needs its own subpanel, typically 100A or 200A fed from the main panel.
- Electric vehicle charging: A Level 2 EV charger draws 32 to 48 amps continuously. Plan a dedicated 50A or 60A circuit from the main panel.
- Electric resistance heating backup: If you're using a heat pump with electric resistance backup strips, those strips can draw 15 to 30A each.
- Future expansion: A 400A service entrance with a 200A main panel and a 200A subpanel for the shop is the most flexible setup for a large barndominium.
Upsizing from 200A to 400A service at the time of initial installation costs roughly $1,500 to $2,500 more than 200A. Upgrading later (after the service entrance is in and the electric co-op has already set the meter) can cost $8,000 to $15,000 including co-op service upgrades. Size right the first time.
Underground Service from Rural Electric Co-ops
Most rural Missouri barndominium sites are served by rural electric cooperatives rather than investor-owned utilities. The co-ops that cover northwest and central Missouri include Platte-Clay Electric, Grundy Electric, and others depending on county. Some areas, including parts of the St. Joseph region, are served by Evergy, an investor-owned utility.
Each co-op has its own standards for underground service. Common requirements include: minimum burial depth (usually 24 inches for primary service laterals), conduit type specifications, distance limitations for service from the pole to your meter base, and inspection requirements before backfilling. Contact your co-op's engineering department early in your project to get the specific requirements for your service address; this affects your site work planning and trenching costs.
Temporary construction power is also a co-op coordination item. You'll need a temporary service pole installed before rough framing begins. Most co-ops charge a deposit and monthly service fee for temp power, which is credited against your permanent service installation.
Shop Subpanel Planning
If your barndominium includes a shop (an attached garage bay or a separate structure), plan its electrical independently from the living space. Shop electrical requirements differ significantly: you need higher-amperage circuits for tools, good lighting at lower mounting heights, multiple 240V circuits for welders and compressors, and possibly 3-phase service if you're running commercial-grade equipment.
A dedicated 100A subpanel in the shop feeds from the main panel via a 2-2-2-4 aluminum feeder (adequate for 100A at reasonable distances). For heavier shop use, run a 200A subpanel on a 2/0-2/0-2/0-4 aluminum feeder. Size the feeder wire based on the distance from main panel to shop; voltage drop at longer distances requires upsizing wire gauge.
Surface-mounted conduit (EMT, electrical metallic tubing) is standard in shop areas. It's durable, easy to modify later, and inspector-friendly. Don't run Romex through a shop; it's not rated for the environment and is easily damaged.
Generator Interlock and Backup Power Planning
Missouri ice storms, spring tornado activity, and summer thunderstorm outages make backup power worth planning from day one. A generator interlock kit installed at the main panel allows you to safely connect a portable generator to your panel without a transfer switch. It's a mechanical interlock that prevents the main breaker and generator breaker from both being on simultaneously, protecting utility workers.
For a whole-house standby generator (propane or natural gas), a proper automatic transfer switch (ATS) is required, not an interlock. Standby generators that run your entire barndominium including HVAC typically need 20 to 22kW capacity for a 2,000 sq ft barndominium.
Rough-in the generator circuit even if you're not buying the generator yet. Running the conduit and breaker while the walls are open costs almost nothing. Adding it later after drywall is installed costs significantly more.
Rough-In Inspection: What Missouri Inspectors Check
Rough-in electrical inspection happens after wiring is installed but before drywall. Inspectors verify: correct wire gauge for each circuit (12 AWG for 20A circuits, 14 AWG for 15A), proper stapling and support of Romex, box fill calculations (ensuring enough cubic inches in each box for the wires entering it), AFCI breaker requirements for bedroom circuits (required by the NEC edition your county or city has adopted), GFCI protection in bathrooms, kitchens, garage, and outdoor locations, and panel labeling.
SIP-specific: inspectors in jurisdictions that don't see many SIP builds may ask questions about your chase routing. Have your panel specifications showing the pre-cut chases available at inspection. Most Missouri inspectors are comfortable with SIP construction but appreciate documentation.